Wednesday, October 19, 2016

CREATE DATABASE LINK


Private database link - belongs to a specific schema of a database. Only the owner of a private database link can use it.
Public database link - all users in the database can use it.
Global database link - defined in an OID or Oracle Names Server. Anyone on the network can use it.

Use CREATE DATABASE LINK statement to create a database link. A database link is a schema object in one database that enables you to access objects on another database.

Once you have created a database link, you can use it to view the tables on the other database using SQL statements, on the other database by appending @dblink to the table. You can also access remote tables using any INSERT, UPDATE, DELETE statements.

Create database link :
create public database link
 
connect to
 
identified by
 
using <'tns_service_name'>;

ex 1 : create database link msql connect to user_sqlserver identified by password using 'MSQL';

ex 2 : create public database link link_db connect to murthy identified by murthy123 using 'local';

ex 3 : create public database link
             demo_db                                         ---- db link name.
              connect to
                  murty identified by murthy123  -- remote db username/password
                  using '192.168.6.201:1521/orcl'; -- remote database ip with port number.


you can check the other schema tables by using the following command

sql> select * from murthy_demo@demo_db

Sunday, October 2, 2016

Failed to create Oracle Cluster Registry configuration, rc 255

In Oracle Rac Grid installation when you run the root.sh file, if you get the following errors :
ORA-27091: unable to queue I/O, ORA-15081 failed to submit an I/O operation to a disk.

[root@ocluster01 ~]# /u01/app/11.2.0/grid/root.sh
Performing root user operation for Oracle 11g

The following environment variables are set as:
    ORACLE_OWNER= grid
    ORACLE_HOME=  /u01/app/11.2.0/grid

Enter the full pathname of the local bin directory: [/usr/local/bin]:
The contents of "dbhome" have not changed. No need to overwrite.
The contents of "oraenv" have not changed. No need to overwrite.
The contents of "coraenv" have not changed. No need to overwrite.

Entries will be added to the /etc/oratab file as needed by
Database Configuration Assistant when a database is created
Finished running generic part of root script.
Now product-specific root actions will be performed.
Using configuration parameter file: /u01/app/11.2.0/grid/crs/install/crsconfig_params
User ignored Prerequisites during installation
Installing Trace File Analyzer
OLR initialization - successful
Adding Clusterware entries to upstart
CRS-2672: Attempting to start 'ora.mdnsd' on 'ocluster01'
CRS-2676: Start of 'ora.mdnsd' on 'ocluster01' succeeded
CRS-2672: Attempting to start 'ora.gpnpd' on 'ocluster01'
CRS-2676: Start of 'ora.gpnpd' on 'ocluster01' succeeded
CRS-2672: Attempting to start 'ora.cssdmonitor' on 'ocluster01'
CRS-2672: Attempting to start 'ora.gipcd' on 'ocluster01'
CRS-2676: Start of 'ora.cssdmonitor' on 'ocluster01' succeeded
CRS-2676: Start of 'ora.gipcd' on 'ocluster01' succeeded
CRS-2672: Attempting to start 'ora.cssd' on 'ocluster01'
CRS-2672: Attempting to start 'ora.diskmon' on 'ocluster01'
CRS-2676: Start of 'ora.diskmon' on 'ocluster01' succeeded
CRS-2676: Start of 'ora.cssd' on 'ocluster01' succeeded

ASM created and started successfully.

Disk Group DATA created successfully.

Errors in file :
ORA-27091: unable to queue I/O
ORA-15081: failed to submit an I/O operation to a disk
ORA-06512: at line 4
Errors in file :
ORA-27091: unable to queue I/O
ORA-15081: failed to submit an I/O operation to a disk
ORA-06512: at line 4
Failed to create Oracle Cluster Registry configuration, rc 255
Oracle Grid Infrastructure Repository configuration failed at /u01/app/11.2.0/grid/crs/install/crsconfig_lib.pm line 6919.
/u01/app/11.2.0/grid/perl/bin/perl -I/u01/app/11.2.0/grid/perl/lib -I/u01/app/11.2.0/grid/crs/install /u01/app/11.2.0/grid/crs/install/rootcrs.pl execution failed
[root@ocluster01 ~]#

there are 2 reasons that might you will get this error is :
1. there might me issue with the permissions of grid base and asm disks.
2.it might be issue with configuration of oracleasm.

first you need to deconfigure the root.sh by using following command.

1. As root, run "$GRID_HOME/crs/install/rootcrs.pl -verbose -deconfig -force" on all nodes, except the last one.
for last node you need to run below command
2. As root, run "$GRID_HOME/crs/install/rootcrs.pl -verbose -deconfig -force -lastnode"

[root@ocluster01 oracle]# /u01/app/11.2.0/grid/crs/install/rootcrs.pl -verbose -deconfig -force
Using configuration parameter file: /u01/app/11.2.0/grid/crs/install/crsconfig_params
PRCR-1119 : Failed to look up CRS resources of ora.cluster_vip_net1.type type
PRCR-1068 : Failed to query resources
Cannot communicate with crsd
PRCR-1070 : Failed to check if resource ora.gsd is registered
Cannot communicate with crsd
PRCR-1070 : Failed to check if resource ora.ons is registered
Cannot communicate with crsd

CRS-2791: Starting shutdown of Oracle High Availability Services-managed resources on 'ocluster01'
CRS-2673: Attempting to stop 'ora.ctssd' on 'ocluster01'
CRS-2673: Attempting to stop 'ora.asm' on 'ocluster01'
CRS-2673: Attempting to stop 'ora.mdnsd' on 'ocluster01'
CRS-2677: Stop of 'ora.mdnsd' on 'ocluster01' succeeded
CRS-2677: Stop of 'ora.asm' on 'ocluster01' succeeded
CRS-2673: Attempting to stop 'ora.cluster_interconnect.haip' on 'ocluster01'
CRS-2677: Stop of 'ora.cluster_interconnect.haip' on 'ocluster01' succeeded
CRS-2677: Stop of 'ora.ctssd' on 'ocluster01' succeeded
CRS-2673: Attempting to stop 'ora.cssd' on 'ocluster01'
CRS-2677: Stop of 'ora.cssd' on 'ocluster01' succeeded
CRS-2673: Attempting to stop 'ora.gipcd' on 'ocluster01'
CRS-2677: Stop of 'ora.gipcd' on 'ocluster01' succeeded
CRS-2673: Attempting to stop 'ora.gpnpd' on 'ocluster01'
CRS-2677: Stop of 'ora.gpnpd' on 'ocluster01' succeeded
CRS-2793: Shutdown of Oracle High Availability Services-managed resources on 'ocluster01' has completed
CRS-4133: Oracle High Availability Services has been stopped.
Removing Trace File Analyzer
error: package cvuqdisk is not installed
Successfully deconfigured Oracle clusterware stack on this node
[root@ocluster01 oracle]# /u01/app/11.2.0/grid/crs/install/rootcrs.pl -verbose -deconfig -force -lastnode
Using configuration parameter file: /u01/app/11.2.0/grid/crs/install/crsconfig_params
Adding Clusterware entries to upstart
crsexcl failed to start
Failed to start the Clusterware. Last 20 lines of the alert log follow:
[client(9216)]CRS-1006:The OCR location +DATA is inaccessible. Details in /u01/app/11.2.0/grid/log/ocluster01/client/ocrconfig_9216.log.
2016-10-02 12:49:30.114:
[client(9216)]CRS-1001:The OCR was formatted using version 3.
[client(12853)]CRS-10001:02-Oct-16 13:06 ACFS-9459: ADVM/ACFS is not supported on this OS version: 'centos-release-6-8.el6.centos.12.3.x86_64
'
[client(12855)]CRS-10001:02-Oct-16 13:06 ACFS-9201: Not Supported
2016-10-02 13:06:31.010:
[ctssd(9018)]CRS-2405:The Cluster Time Synchronization Service on host ocluster01 is shutdown by user
2016-10-02 13:06:31.017:
[mdnsd(8889)]CRS-5602:mDNS service stopping by request.
2016-10-02 13:06:43.359:
[cssd(8957)]CRS-1603:CSSD on node ocluster01 shutdown by user.
2016-10-02 13:06:43.855:
[ohasd(8496)]CRS-2767:Resource state recovery not attempted for 'ora.cssdmonitor' as its target state is OFFLINE
2016-10-02 13:06:43.856:
[ohasd(8496)]CRS-2769:Unable to failover resource 'ora.cssdmonitor'.
2016-10-02 13:06:44.771:
[ohasd(8496)]CRS-2769:Unable to failover resource 'ora.cssd'.
2016-10-02 13:06:48.722:
[gpnpd(8900)]CRS-2329:GPNPD on node ocluster01 shutdown.

****Unable to retrieve Oracle Clusterware home.
Start Oracle Clusterware stack and try again.
****Unable to retrieve Oracle Clusterware home.
Start Oracle Clusterware stack and try again.
****Unable to retrieve Oracle Clusterware home.
Start Oracle Clusterware stack and try again.
****Unable to retrieve Oracle Clusterware home.
Start Oracle Clusterware stack and try again.
****Unable to retrieve Oracle Clusterware home.
Start Oracle Clusterware stack and try again.
Either /etc/oracle/ocr.loc does not exist or is not readable
Make sure the file exists and it has read and execute access
Either /etc/oracle/ocr.loc does not exist or is not readable
Make sure the file exists and it has read and execute access
CRS-4047: No Oracle Clusterware components configured.
CRS-4000: Command Stop failed, or completed with errors.
Either /etc/oracle/ocr.loc does not exist or is not readable
Make sure the file exists and it has read and execute access
Either /etc/oracle/ocr.loc does not exist or is not readable
Make sure the file exists and it has read and execute access
################################################################
# You must kill processes or reboot the system to properly #
# cleanup the processes started by Oracle clusterware          #
################################################################
Either /etc/oracle/ocr.loc does not exist or is not readable
Make sure the file exists and it has read and execute access
Either /etc/oracle/ocr.loc does not exist or is not readable
Make sure the file exists and it has read and execute access
Either /etc/oracle/olr.loc does not exist or is not readable
Make sure the file exists and it has read and execute access
Either /etc/oracle/olr.loc does not exist or is not readable
Make sure the file exists and it has read and execute access
Failure in execution (rc=-1, 256, No such file or directory) for command /etc/init.d/ohasd deinstall
error: package cvuqdisk is not installed
Successfully deconfigured Oracle clusterware stack on this node
[root@ocluster01 oracle]# 


then remove the existing ASMdisks : 

[root@ocluster01 ~]# /etc/init.d/oracleasm deletedisk ASMDISK1
Removing ASM disk "ASMDISK1":                              [  OK  ]
[root@ocluster01 ~]# /etc/init.d/oracleasm deletedisk ASMDISK2
Removing ASM disk "ASMDISK2":                              [  OK  ]
[root@ocluster01 ~]# /etc/init.d/oracleasm deletedisk ASMDISK3
Removing ASM disk "ASMDISK3":   
[root@ocluster01 ~]#

then after you have to configure the oracleasm and create disks again as following :
[root@ocluster01 ~]# /etc/init.d/oracleasm configure -i
Configuring the Oracle ASM library driver.

This will configure the on-boot properties of the Oracle ASM library
driver.  The following questions will determine whether the driver is
loaded on boot and what permissions it will have.  The current values
will be shown in brackets ('[]').  Hitting without typing an
answer will keep that current value.  Ctrl-C will abort.

Default user to own the driver interface [grid]: grid
Default group to own the driver interface [dba]: asmadmin

Start Oracle ASM library driver on boot (y/n) [y]: y
Scan for Oracle ASM disks on boot (y/n) [y]: y
Writing Oracle ASM library driver configuration: done
Initializing the Oracle ASMLib driver:                     [  OK  ]
Scanning the system for Oracle ASMLib disks:               [  OK  ]
 

[root@ocluster01 ~]# /etc/init.d/oracleasm init
Usage: /etc/init.d/oracleasm {start|stop|restart|enable|disable|configure|createdisk|deletedisk|querydisk|listdisks|scandisks|status}
[root@ocluster01 ~]# /etc/init.d/oracleasm createdisk ASMDISK1 /dev/sdb1
Marking disk "ASMDISK1" as an ASM disk:                    [  OK  ]
[root@ocluster01 ~]# /etc/init.d/oracleasm createdisk ASMDISK2 /dev/sdc1
Marking disk "ASMDISK2" as an ASM disk:                    [  OK  ]
[root@ocluster01 ~]# /etc/init.d/oracleasm createdisk ASMDISK3 /dev/sdd1
Marking disk "ASMDISK3" as an ASM disk:                    [  OK  ]
[root@ocluster01 ~]# /etc/init.d/oracleasm scandisks
Scanning the system for Oracle ASMLib disks:               [  OK  ]
[root@ocluster01 ~]# /etc/init.d/oracleasm listdisks
ASMDISK1
ASMDISK2
ASMDISK3
[root@ocluster01 ~]#

After successfully created the ASM disks then you have to re run the root.sh .

[root@ocluster01 ~]# /u01/app/11.2.0/grid/root.sh

hope you will get success... All the best.!!!.

Another reason might be issue with permissions.

keep check the grid base & grid home.
Grid_base and Grid_home groups it should be grid:oinstall.

Disk Permissions.

[root@ocluster01 ~]# ls -l /dev/oracleasm/disks/
total 0
brw-rw---- 1 grid asmadmin 8, 17 Oct  2 12:45 ASMDISK1
brw-rw---- 1 grid asmadmin 8, 33 Oct  2 12:45 ASMDISK2
brw-rw---- 1 grid asmadmin 8, 49 Oct  2 12:45 ASMDISK3
[root@ocluster01 ~]# ll /dev/sd*
brw-rw---- 1 root disk 8,  0 Oct  2 01:30 /dev/sda
brw-rw---- 1 root disk 8,  1 Oct  1 15:25 /dev/sda1
brw-rw---- 1 root disk 8,  2 Oct  1 15:25 /dev/sda2
brw-rw---- 1 root disk 8, 16 Oct  2 12:45 /dev/sdb
brw-rw---- 1 root disk 8, 17 Oct  2 12:45 /dev/sdb1


Monday, September 26, 2016

Check default NLS_DATE_FORMAT and NLS parameter in Oracle

There is a system view to check the NLS parameters.

SELECT * FROM V$NLS_PARAMETERS;

SQL> SELECT * FROM V$NLS_PARAMETERS;

PARAMETER                      VALUE
------------------------- -----------------------------
NLS_LANGUAGE              AMERICAN
NLS_TERRITORY             AMERICA
NLS_CURRENCY              $
NLS_ISO_CURRENCY          AMERICA
NLS_NUMERIC_CHARACTERS    .,
NLS_CALENDAR              GREGORIAN
NLS_DATE_FORMAT           DD-MON-YYYY HH24:MI:SS
NLS_DATE_LANGUAGE         AMERICAN
NLS_CHARACTERSET          WE8MSWIN1252
NLS_SORT                  BINARY
NLS_TIME_FORMAT           HH.MI.SSXFF AM

PARAMETER                 VALUE
------------------------- -----------------------------
NLS_TIMESTAMP_FORMAT      DD-MON-RR HH.MI.SSXFF AM
NLS_TIME_TZ_FORMAT        HH.MI.SSXFF AM TZR
NLS_TIMESTAMP_TZ_FORMAT   DD-MON-RR HH.MI.SSXFF AM TZR
NLS_DUAL_CURRENCY         $
NLS_NCHAR_CHARACTERSET    AL16UTF16
NLS_COMP                  BINARY
NLS_LENGTH_SEMANTICS      BYTE
NLS_NCHAR_CONV_EXCP       FALSE

these are the default parameters which is there in oracle.

if  you want to change any one of the parameter you can do changes by using alter command.

if you want to find the individual values for the specific parameter then you need to run the query by specifying the parameter.

SELECT VALUE FROM NLS_DATABASE_PARAMETERS WHERE PARAMETER = 'NLS_DATE_FORMAT'

like below :

ALTER SESSION SET NLS_DATE_FORMAT='DD-MON-YYYY HH24:MI:SS';
in the same way you can do for the other parameters.

if you want to save the session settings permanently you need to add the option "SCOPE=SPFILE" at the end of the command. 


Thursday, September 22, 2016

Toad – SQLNET Editor && TNS Names Editor are Disabled?

After successfully Installed the toad, while trying to connect to a Database using Toad with TNS, Even the TNS entry is created in tnsnames.ora file under Oracle Home\NETWORK\ADMIN Not able to connect the due to TNS Editor and SQLNET editors are disabled.

For Toad version 11.0 above need to install the oracle client 64 bit version .

Issue 1: SQLNET Editor and TNS Names Editor Disabled as shown in below pic.

And not able to find the TNS Name in the drop down as shown in below pic

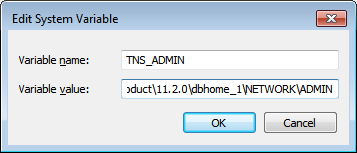
Solution : Go to environmental variables and create a new variable Name as “TNS_ADMIN” and set the value as  Oracle Home\NETWORK\ADMIN.

Thursday, July 28, 2016

Dynamic File Name in Command Spool

Is it possible to change the spool file name dynamically?

Yes its possible to change the name dynamically. but its depending on the requirement.Here is the sample example how we can add the date string to the file name.

once you know how to add the date string to file name then you can apply the same formula to any others.

we have to take one dummy column to print and will take the date in to that dummy column. see the example below

SQL> column filename new_val filename
SQL> select sysdate filename from dual;

FILENAME
---------
28-JUL-16

SQL> spool &filename
SQL> select sysdate from dual;

SYSDATE
---------
28-JUL-16

SQL> spool off;
SQL>
once its done ,you can check the file in the same folder from where you have login to oracle.
or you can specify the path to generate the file.

for this case all the files will generate with the extinction is ".LST". example : "28-JUL-16.LST"


Monday, July 25, 2016

Oracle listener errors : Troubleshooting Oracle Net Services :ORA-12541 TNS :no listener:ORA-01034: ORA-27101

Oracle listener errors :

you may get following type of error for listener :

C:\Users\Administrator>lsnrctl status
Connecting to (DESCRIPTION=(ADDRESS=(PROTOCOL=TCP)(HOST=WIN-JSJDDUESQH9)(PORT=1521)))
TNS-12541: TNS:no listener
TNS-12560: TNS:protocol adapter error
TNS-00511: No listener
64-bit Windows Error: 61: Unknown error

When you get the error "TNS no listener errors", that the Windows listener service is not accepting connections or the service is not running.As recommended need to re-start the listener by using the command "lsnrctl start" or lsnrctl reload  
 Once the listener started using "LNSRCTL START or LSNRCTL RELOAD" listener will start and you can observe the status of current listener by run the following command "LSNRCTL STATUS"
Most of the cases once the listener will start then your are able to connect the oracle and issue got resolved.Even though listener was running some time you may get another type of errors like "ORA-01034: ORA-27101:  "as following :
C:\Users\Administrator>sqlplus

SQL*Plus: Release 11.2.0.1.0 Production on Mon Jul 25 17:44:31 2016

Copyright (c) 1982, 2010, Oracle.  All rights reserved.

Enter user-name: system
Enter password:
ERROR:
ORA-01034: ORACLE not available
ORA-27101: shared memory realm does not exist
Process ID: 0
Session ID: 0 Serial number: 0
For these kind of errors even listener was running, we have to run the following commands to resolve the issue. We have to connect the oracle by using /nolog first and then run the below commands.
set oracle_sid=orcl
sqlplus /nolog
conn sys/sys as sysdba
shutdown abort
startup
check the below image :
now the oracle has started successfully and you are able to see the ORCL instance in listener status also.

Thursday, July 21, 2016

ORACLE 12C INSTALLATION STEP BY STEP

Prerequisites to install ORACLE 12C  :

Download Software :

Download the Oracle software from OTN depending on your requirements.

    OTN: Oracle Database 12c Release 1 (12.1.0.2.0) for Linux x86-64

download it from ORACLE site or use the following url

http://www.oracle.com/technetwork/database/enterprise-edition/downloads/database12c-linux-download-2240591.html

Verify that your system has correct hostname, static IP address and distribution version, using following commands.
If you’ve not set your system hostname, edit the system hosts file ‘/etc/hosts‘ and enter your hostname entry along with IP address as shown below.

hostname   # to check the hostname
vi /etc/hosts  # to Update the new hostname


Need to change the SELinux mode to permissive and restart the system for Permanent changes of selinux
edit the file using vi editor and update as SELINUX=permissive


vi /etc/sysconfig/


#Installing Packages and changing Kernel Values
Check the below listed packages are already installed or not if not please install them :
# From Public Yum
yum install binutils -y
yum install compat-libcap1 -y
yum install compat-libstdc++-33 -y
yum install compat-libstdc++-33.i686 -y
yum install gcc -y
yum install gcc-c++ -y
yum install glibc -y
yum install glibc.i686 -y
yum install glibc-devel -y
yum install glibc-devel.i686 -y
yum install ksh -y
yum install libgcc -y
yum install libgcc.i686 -y
yum install libstdc++ -y
yum install libstdc++.i686 -y
yum install libstdc++-devel -y
yum install libstdc++-devel.i686 -y
yum install libaio -y
yum install libaio.i686 -y
yum install libaio-devel -y
yum install libaio-devel.i686 -y
yum install libXext -y
yum install libXext.i686 -y
yum install libXtst -y
yum install libXtst.i686 -y
yum install libX11 -y
yum install libX11.i686 -y
yum install libXau -y
yum install libXau.i686 -y
yum install libxcb -y
yum install libxcb.i686 -y
yum install libXi -y
yum install libXi.i686 -y
yum install make -y
yum install sysstat -y
yum install unixODBC -y
yum install unixODBC-devel -y

Once completed the package installation, Edit the kernal parameters in file and update the following as suggested by the ORACLE:


vi /etc/sysct.conf

kernel.shmmax = 4294967295

kernel.shmall = 2097152

fs.aio-max-nr = 1048576

fs.file-max = 6815744

kernel.shmmni = 4096

kernel.sem = 250 32000 100 128

net.ipv4.ip_local_port_range = 9000 65500

net.core.rmem_default = 262144

net.core.rmem_max = 4194304

net.core.wmem_default = 262144

net.core.wmem_max = 1048576

Once the file got updated then issue following command to effect the new changes.

/sbin/sysctl -p

Add add the following lines to the "/etc/security/limits.conf" file.


vi /etc/security/limits.conf


oracle   soft   nofile    1024

oracle   hard   nofile    65536

oracle   soft   nproc    16384

oracle   hard   nproc    16384

oracle   soft   stack    10240

oracle   hard   stack    32768

Configuring System for Oracle Installation
 Create new as Oracle DBA,OPER and OINSTALL for oracle installation

groupadd -g 54321 oracle
groupadd -g 54322 dba
groupadd -g 54323 oper
groupadd -g 54324 oinstall


Create user oracle and add the user to specified groups.


useradd -u 54321 -g oracle -G dba,oper oracle

passwd oracle

Create the following directories for installing Oracle and change the ownership of the directories and grand permission to the newly created directories.


mkdir -p /u01/app/oracle/product/12.1.0/dbhome_1

chown -R oracle:oracle /u01

chmod -R 775 /u01

ll /u01

Once successfully created the oracle user then we need to add environmental variable for oracle user. Edit the bash_profile file of oracle user and append the oracle environment entries listed below.


/home/oracle/.bash_profile

edit the file from oracle user and add the following lines into the bash_profile.

# Oracle Env Settings

export TMP=/tmp

export TMPDIR=$TMP


export ORACLE_HOSTNAME=murthy.oracle12

export ORACLE_UNQNAME=orcl

export ORACLE_BASE=/u01/app/oracle

export ORACLE_HOME=$ORACLE_BASE/product/12.1.0/dbhome_1

export ORACLE_SID=orcl


export PATH=/usr/sbin:$PATH

export PATH=$ORACLE_HOME/bin:$PATH


export LD_LIBRARY_PATH=$ORACLE_HOME/lib:/lib:/usr/lib

export CLASSPATH=$ORACLE_HOME/jlib:$ORACLE_HOME/rdbms/jlib

Save and exit the file.

Till now we have successfully completed the prerequisites to install the oracle 12c.

Installing Oracle 12c Database in Red hat 6.x

 After download the software extract the .zip files using unzip command, After extracting we will get database directory into the same folder. To start installation need to run the command "./runInstaller" from installer Directory(database directory).

For unzip use the following command

unzip linuxamd64_12102_database_1of2

unzip linuxamd64_12102_database_2of2


# cd database/
# ./runInstaller


Once you run the ./runInstaller then you will get the first screen as below.
the above screen I am going to skip this step as I don’t want security updates. then you will get error message as follow :
Click "YES" and choose the installation type.
I am choosing the first option ,Create and configure a database from below screen and click next.
we are going to choose Server Class here. If we want to install in any Desktop machines we can choose the above Option as Desktop Class. NEXT
we are going to select "single instance database installation" ,Next
 Choose Advance install option to get more options in the Installation steps, Next
Default Language will be chooses as English. you can change according to your language if needed , Next
Here we have to choose which edition of database installation we are going to do.Oracle has specified the minimum size of disk space requirement based on installation type.I am going to select Enterprise edition for testing purpose. Next,
Here we have to to specify oracle installation path, it will fetch the configuration based on our ".bash_profile".Next,
Oracle Inventory files will be created under ‘/u01/app/oralnventory‘ directory. Let us choose the Oracle as the Group for Operating system group,Next
Select the type of database, you want to create. I am choosing general option Since, I am using it for General purpose. Next,
Specify the Global Database name for uniquely identified and UN-check the Create as Container database, because we are not going to create multiple databases.
Check the box that says Enable Automatic Memory Management and keep the default memory allocation oracle recommendations.  Next,
Here we are not using ASM and using file system, so we need to choose the location to store the database.I’m going to assign ‘/u01/app/oracle/oradata‘ location to save the databases and Click Next to continue to installer steps.
I don’t have a Cloud control manager credentials from oracle, so I have to skip this step.Next
In realtime environment we have to enable these options as mandatory.Now I am going to skip these steps. Next
Here we need to define the password for different users or same for all users . next
Would suggest to create password oracle standards,if not will get popup like this,click "YES"
Need to provide system privileges to create database. Choose oracle for every options.

Finally we can review all settings before database installation starts. If we want any changes we can edit the settings. click on "Install" to start the installation  
Database installation was started successfully and installation started to Preparation and copying files. This will take long time to complete according to our Hardware Resource.
During setup process, it will ask to run two scripts as a root user as shown in the above picture.
Login as root user and run the scripts.
 After successfully execution of above two scripts, click on OK to continue
 Database configuration Assistant installation process ...

Finally Oracle Database installation was successfully completed. Click on Close to quit the Oracle Installer.Using the URL you can login into browser with the DB credentials and you can do the system operations.

Click close to end the installation.