Thursday, July 21, 2016

ORACLE 12C INSTALLATION STEP BY STEP

Prerequisites to install ORACLE 12C  :

Download Software :

Download the Oracle software from OTN depending on your requirements.

    OTN: Oracle Database 12c Release 1 (12.1.0.2.0) for Linux x86-64

download it from ORACLE site or use the following url

http://www.oracle.com/technetwork/database/enterprise-edition/downloads/database12c-linux-download-2240591.html

Verify that your system has correct hostname, static IP address and distribution version, using following commands.
If you’ve not set your system hostname, edit the system hosts file ‘/etc/hosts‘ and enter your hostname entry along with IP address as shown below.

hostname   # to check the hostname
vi /etc/hosts  # to Update the new hostname


Need to change the SELinux mode to permissive and restart the system for Permanent changes of selinux
edit the file using vi editor and update as SELINUX=permissive


vi /etc/sysconfig/


#Installing Packages and changing Kernel Values
Check the below listed packages are already installed or not if not please install them :
# From Public Yum
yum install binutils -y
yum install compat-libcap1 -y
yum install compat-libstdc++-33 -y
yum install compat-libstdc++-33.i686 -y
yum install gcc -y
yum install gcc-c++ -y
yum install glibc -y
yum install glibc.i686 -y
yum install glibc-devel -y
yum install glibc-devel.i686 -y
yum install ksh -y
yum install libgcc -y
yum install libgcc.i686 -y
yum install libstdc++ -y
yum install libstdc++.i686 -y
yum install libstdc++-devel -y
yum install libstdc++-devel.i686 -y
yum install libaio -y
yum install libaio.i686 -y
yum install libaio-devel -y
yum install libaio-devel.i686 -y
yum install libXext -y
yum install libXext.i686 -y
yum install libXtst -y
yum install libXtst.i686 -y
yum install libX11 -y
yum install libX11.i686 -y
yum install libXau -y
yum install libXau.i686 -y
yum install libxcb -y
yum install libxcb.i686 -y
yum install libXi -y
yum install libXi.i686 -y
yum install make -y
yum install sysstat -y
yum install unixODBC -y
yum install unixODBC-devel -y

Once completed the package installation, Edit the kernal parameters in file and update the following as suggested by the ORACLE:


vi /etc/sysct.conf

kernel.shmmax = 4294967295

kernel.shmall = 2097152

fs.aio-max-nr = 1048576

fs.file-max = 6815744

kernel.shmmni = 4096

kernel.sem = 250 32000 100 128

net.ipv4.ip_local_port_range = 9000 65500

net.core.rmem_default = 262144

net.core.rmem_max = 4194304

net.core.wmem_default = 262144

net.core.wmem_max = 1048576

Once the file got updated then issue following command to effect the new changes.

/sbin/sysctl -p

Add add the following lines to the "/etc/security/limits.conf" file.


vi /etc/security/limits.conf


oracle   soft   nofile    1024

oracle   hard   nofile    65536

oracle   soft   nproc    16384

oracle   hard   nproc    16384

oracle   soft   stack    10240

oracle   hard   stack    32768

Configuring System for Oracle Installation
 Create new as Oracle DBA,OPER and OINSTALL for oracle installation

groupadd -g 54321 oracle
groupadd -g 54322 dba
groupadd -g 54323 oper
groupadd -g 54324 oinstall


Create user oracle and add the user to specified groups.


useradd -u 54321 -g oracle -G dba,oper oracle

passwd oracle

Create the following directories for installing Oracle and change the ownership of the directories and grand permission to the newly created directories.


mkdir -p /u01/app/oracle/product/12.1.0/dbhome_1

chown -R oracle:oracle /u01

chmod -R 775 /u01

ll /u01

Once successfully created the oracle user then we need to add environmental variable for oracle user. Edit the bash_profile file of oracle user and append the oracle environment entries listed below.


/home/oracle/.bash_profile

edit the file from oracle user and add the following lines into the bash_profile.

# Oracle Env Settings

export TMP=/tmp

export TMPDIR=$TMP


export ORACLE_HOSTNAME=murthy.oracle12

export ORACLE_UNQNAME=orcl

export ORACLE_BASE=/u01/app/oracle

export ORACLE_HOME=$ORACLE_BASE/product/12.1.0/dbhome_1

export ORACLE_SID=orcl


export PATH=/usr/sbin:$PATH

export PATH=$ORACLE_HOME/bin:$PATH


export LD_LIBRARY_PATH=$ORACLE_HOME/lib:/lib:/usr/lib

export CLASSPATH=$ORACLE_HOME/jlib:$ORACLE_HOME/rdbms/jlib

Save and exit the file.

Till now we have successfully completed the prerequisites to install the oracle 12c.

Installing Oracle 12c Database in Red hat 6.x

 After download the software extract the .zip files using unzip command, After extracting we will get database directory into the same folder. To start installation need to run the command "./runInstaller" from installer Directory(database directory).

For unzip use the following command

unzip linuxamd64_12102_database_1of2

unzip linuxamd64_12102_database_2of2


# cd database/
# ./runInstaller


Once you run the ./runInstaller then you will get the first screen as below.
the above screen I am going to skip this step as I don’t want security updates. then you will get error message as follow :
Click "YES" and choose the installation type.
I am choosing the first option ,Create and configure a database from below screen and click next.
we are going to choose Server Class here. If we want to install in any Desktop machines we can choose the above Option as Desktop Class. NEXT
we are going to select "single instance database installation" ,Next
 Choose Advance install option to get more options in the Installation steps, Next
Default Language will be chooses as English. you can change according to your language if needed , Next
Here we have to choose which edition of database installation we are going to do.Oracle has specified the minimum size of disk space requirement based on installation type.I am going to select Enterprise edition for testing purpose. Next,
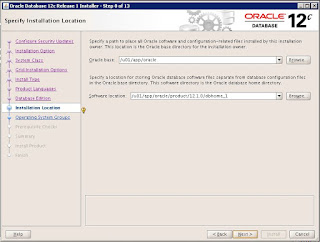
Here we have to to specify oracle installation path, it will fetch the configuration based on our ".bash_profile".Next,
Oracle Inventory files will be created under ‘/u01/app/oralnventory‘ directory. Let us choose the Oracle as the Group for Operating system group,Next
Select the type of database, you want to create. I am choosing general option Since, I am using it for General purpose. Next,
Specify the Global Database name for uniquely identified and UN-check the Create as Container database, because we are not going to create multiple databases.
Check the box that says Enable Automatic Memory Management and keep the default memory allocation oracle recommendations.  Next,
Here we are not using ASM and using file system, so we need to choose the location to store the database.I’m going to assign ‘/u01/app/oracle/oradata‘ location to save the databases and Click Next to continue to installer steps.
I don’t have a Cloud control manager credentials from oracle, so I have to skip this step.Next
In realtime environment we have to enable these options as mandatory.Now I am going to skip these steps. Next
Here we need to define the password for different users or same for all users . next
Would suggest to create password oracle standards,if not will get popup like this,click "YES"
Need to provide system privileges to create database. Choose oracle for every options.

Finally we can review all settings before database installation starts. If we want any changes we can edit the settings. click on "Install" to start the installation  
Database installation was started successfully and installation started to Preparation and copying files. This will take long time to complete according to our Hardware Resource.
During setup process, it will ask to run two scripts as a root user as shown in the above picture.
Login as root user and run the scripts.
 After successfully execution of above two scripts, click on OK to continue
 Database configuration Assistant installation process ...

Finally Oracle Database installation was successfully completed. Click on Close to quit the Oracle Installer.Using the URL you can login into browser with the DB credentials and you can do the system operations.

Click close to end the installation.

Friday, July 15, 2016

ORA-01033: ORACLE initialization or shutdown in progress or Process ID: 0 & Session ID: 0

ORA-01033: ORACLE initialization or shutdown in progress  or Process ID: 0 & Session ID: 0

Some times database will not mount correctly. we need to mount it manually step by step..

C:\Users\Administrator>sqlplus

SQL*Plus: Release 11.2.0.2.0 Production on Mon Jul 25 14:59:33 2016

Copyright (c) 1982, 2010, Oracle.  All rights reserved.

Enter user-name: system
Enter password:
ERROR:
ORA-01033: ORACLE initialization or shutdown in progress
Process ID: 0
Session ID: 0 Serial number: 0


Enter user-name:

For manual  shutdown and startup the database you need to follow the steps, first Shut down it and start it up then mount.see following commands and how to run the commands.
  1. sqlplus / as sysdba;
  2. shutdown immediate;
  3. startup nomount;
  4. alter database mount;
  5. alter database open;
in case when you run the fist command " sqlplus / as sysdba;"  and if you get any errors like "ERROR:
ORA-01031: insufficient privileges.

then you have to run it as  "sys as sysdba"  and followed by the sequence.


Please check the below image I have executed the commands and able to connect the sysdba user.

Once all the commands were executed successfully, now oracle is mounted and open state and your able to connect the users.
In the above image also I am not able to connect sysdba, the I will use the sys as sysdba to connect.

Installation of Maual process for odac patch (ODAC112040Xcopy_32bit) of oracle 11.4

Installation process for odac patch of oracle 11.4
Download it from Oracle site or use the following url:
http://www.oracle.com/us/sitemaps/utilsoft-087491.html


select the proper version of the oracle client from the above URL  and download.

After download extract the zip file.
then need to follow the below steps to install the patch.


install.bat ==>component to install ==> existing oracle_home==> where to install the new product
(install.bat odp.net4 D:\app\pos\product D:\app\pos\product )


example : 
C:\Users\pos\Desktop\ODAC112040Xcopy_32bit> install.bat odp.net4 D:\app\pos\product D:\app\pos\product


Friday, March 4, 2016

TableSpaces : Free & Used spaces in tablespaces

To find out the free and used spaces from the tablespaces use the below queries : 

Method :- 1
column "Tablespace" format a58
column "Used MB"    format 99,999,999
column "Free MB"    format 99,999,999
column "Total MB"   format 99,999,999
select
   fs.tablespace_name                          "Tablespace",
   (df.totalspace - fs.freespace)              "Used MB",
   fs.freespace                                "Free MB",
   df.totalspace                               "Total MB",
   round(100 * (fs.freespace / df.totalspace)) "Pct. Free"
from
   (select
      tablespace_name,
      round(sum(bytes) / 1048576) TotalSpace
   from
      dba_data_files
   group by
      tablespace_name
   ) df,
   (select
      tablespace_name,
      round(sum(bytes) / 1048576) FreeSpace
   from
      dba_free_space
   group by
      tablespace_name
   ) fs
where
   df.tablespace_name = fs.tablespace_name;

Method :-2 

set linesize 130 tab off trimspool on 
set pagesize 105 
set feedback on  
set pause off 
set echo off

column "TOTAL ALLOCATED (MB)" format 9,999,990.00 
column "TOTAL PHYS ALLOCATED (MB)" format 9,999,990.00 
column "USED (MB)" format 9,999,990.00 
column "FREE (MB)" format 9,999,990.00 
column "% USED" format 990.00


select a.tablespace_name,
       a.bytes_alloc/(1024*1024) "TOTAL ALLOCATED (MB)",
       a.physical_bytes/(1024*1024) "TOTAL PHYS ALLOCATED (MB)",
       nvl(b.tot_used,0)/(1024*1024) "USED (MB)",
       (nvl(b.tot_used,0)/a.bytes_alloc)*100 "% USED"
from ( select tablespace_name,
       sum(bytes) physical_bytes,
       sum(decode(autoextensible,'NO',bytes,'YES',maxbytes)) bytes_alloc
       from dba_data_files
       group by tablespace_name ) a,
     ( select tablespace_name, sum(bytes) tot_used
       from dba_segments
       group by tablespace_name ) b
where a.tablespace_name = b.tablespace_name (+)
--and   (nvl(b.tot_used,0)/a.bytes_alloc)*100 > 10
and   a.tablespace_name not in (select distinct tablespace_name from dba_temp_files)
and   a.tablespace_name not like 'UNDO%'
order by 1
--order by 5
/

both are giving the same results.But second one can be customized based on the requirement if you want to see the tablespaces in GB then you can change it accordingly.

Mothed :- 3

SELECT  a.tablespace_name,
    ROUND (((c.BYTES - NVL (b.BYTES, 0)) / c.BYTES) * 100,2) percentage_used,
    c.BYTES / 1024 / 1024 space_allocated,
    ROUND (c.BYTES / 1024 / 1024 - NVL (b.BYTES, 0) / 1024 / 1024,2) space_used,
    ROUND (NVL (b.BYTES, 0) / 1024 / 1024, 2) space_free, 
    c.DATAFILES
  FROM dba_tablespaces a,
       (    SELECT   tablespace_name, 
                  SUM (BYTES) BYTES
           FROM   dba_free_space
       GROUP BY   tablespace_name
       ) b,
      (    SELECT   COUNT (1) DATAFILES, 
                  SUM (BYTES) BYTES, 
                  tablespace_name
           FROM   dba_data_files
       GROUP BY   tablespace_name
    ) c
  WHERE b.tablespace_name(+) = a.tablespace_name 
    AND c.tablespace_name(+) = a.tablespace_name
ORDER BY NVL (((c.BYTES - NVL (b.BYTES, 0)) / c.BYTES), 0) DESC;
 

Monday, November 30, 2015

ORA-01078: && LRM-00109 failure in processing system parameters

SQL> startup
ORA-01078: failure in processing system parameters
LRM-00109: could not open parameter file '/u01/app/oracle/product/11.2.0/db_1/dbs/initORCL.ora'

solution:

there ware two options to resolve this issue.

1. in linux system export the SID and then try to start the db.

[oracle@murthy dbs]$ export ORACLE_SID=orcl
[oracle@murthy dbs]$ sqlplus / as sysdba

SQL*Plus: Release 11.2.0.1.0 Production on Mon Nov 30 18:23:35 2015

Copyright (c) 1982, 2009, Oracle.  All rights reserved.


Connected to:
Oracle Database 11g Enterprise Edition Release 11.2.0.1.0 - 64bit Production
With the Partitioning, OLAP, Data Mining and Real Application Testing options

SQL> 

2. create the init.ora file to startup the db.

SQL> startup
ORA-01078: failure in processing system parameters
LRM-00109: could not open parameter file '/u01/app/oracle/product/11.2.0/db_1/dbs/initORCL.ora'
SQL> exit
Disconnected
[oracle@murthy dbs]$ ls
hc_orcl.dat  init.ora  lkORCL  orapworcl  spfileorcl.ora
[oracle@murthy dbs]$ sqlplus / as sysdba

SQL*Plus: Release 11.2.0.1.0 Production on Mon Nov 30 18:10:27 2015

Copyright (c) 1982, 2009, Oracle.  All rights reserved.

Connected to an idle instance.

SQL> create pfile from spfile='/u01/app/oracle/product/11.2.0/db_1/dbs/spfileorcl.ora';

File created.


after successfully created the file then try to start the db.

Tuesday, July 28, 2015

Basics of SQL

1.What is Database :

A database is a collection of information that is organized so that it can easily be accessed, managed, and updated. In one view, databases can be classified according to types of content 

2.What is a table :

Tables are the basic unit of data storage in an Oracle Database. Data is stored in rows and columns. You define a table with a table name, such as employees , and a set of columns.

basic syntax to create table : 

CREATE TABLE table_name ( column1 datatype [ NULL | NOT NULL ], column2 datatype [ NULL | NOT NULL ], ... column_n datatype [ NULL | NOT NULL ] );

Create table Murthy (sno number,name varchar2);


3.What is view :

A view is a named and validated SQL query which is stored in the Oracle data dictionary. Views do not contain any data - it is just a stored query in the database that can be executed when called. One can think of a view as a virtual table or mapping of data from one or more tables

Syntax to create a view : 
 
CREATE VIEW emp_view AS SELECT last_name, salary*12 annual_salary FROM employees WHERE department_id = 20;


4.What is join and types of joins :

  • INNER JOIN: Returns all rows when there is at least one match in BOTH tables
  • LEFT JOIN: Return all rows from the left table, and the matched rows from the right table
  • RIGHT JOIN: Return all rows from the right table, and the matched rows from the left table
  • FULL JOIN: Return all rows when there is a match in ONE of the tables
Note :
LEFT JOIN is same as LEFT OUTER JOIN

RIGHT JOIN is same as RIGHT OUTER JOIN

5. Oracle Constraints :

  • Not null

  • Unique Constraint

  • Primary Key

  •  Foreign key

  • Check constraint

A NOT NULL constraint prohibits a database value from being null.

A unique constraint prohibits multiple rows from having the same value in the same column or combination of columns but allows some values to be null.

A primary key constraint combines a NOT NULL constraint and a unique constraint in a single declaration. That is, it prohibits multiple rows from having the same value in the same column or combination of columns and prohibits values from being null.

A foreign key constraint requires values in one table to match values in another table.

A check constraint requires a value in the database to comply with a specified condition.

A REF column by definition references an object in another object type or in a relational table. A REF constraint lets you further describe the relationship between the REF column and the object it references.
 

6.What is the difference between primary key and unique key

Unique KeyPrimary Key
A table can contain more than one unique keyA table can contain only one primary key (can be one/more columns)
Unique key allows one null valuePrimary key will not allow null values

7.What are DDL and DML commands .

DDL (DataDifinition Language)DML (Data Manipulation Language)
CreateSelect
AlterInsert
TruncateUpdate
DropDeletet

8. What is the difference between “delete” , “truncate” and “drop” commands
 
Delete CommandTruncate CommandDrop Command
Delete Command Belongs to DMLTruncate Command Belongs to DDLDrop Command Belongs to DDL
Can be Used to delete entire Table dataCan be Used to delete entire Table dataCan be Used to delete entire Table data and also the structure
Can be used to delete specific rows using where clauseCan't be used to delete specific rows using where clauseCan't be used to delete specific rows using where clause
Can be rolled backCan't be rolled backCan't be rolled back

 
9. Relation between views and tables

Tables are the actual database entities that hold your rows.
Views are "imaginary" tables that are constructed based on the actual tables.

A table contains data, a view is just a SELECT statement which has been saved in the database
The advantage of a view is that it can join data from several tables thus creating a new view of it. Say you have a database with salaries and you need to do some complex statistical queries on it.

Instead of sending the complex query to the database all the time, you can save the query as a view and then SELECT * FROM view

Syntax : 
CREATE VIEW view_name AS SELECT columns
  FROM tables WHERE conditions;

10. What are function,trigger and stored procedures :
A stored procedure is a user defined piece of code written in the local version of PL/SQL, which may return a value that is invoked by calling it explicitly.

A trigger is a stored procedure that runs automatically when various events happen (eg update, insert, delete).


A function is a user defined piece of code and it should return a value making it a function.

Syntax : 
Procedure : 
CREATE [OR REPLACE] PROCEDURE procedure_name
    [ (parameter [,parameter]) ]
IS
   [declaration_section]
BEGIN
    executable_section
[EXCEPTION
    exception_section]
END [procedure_name];


11. What is the purpose of ‘distinct’ in sql

Distinct is used to display unique values
Ex:
Select distinct from
Select distinct ename from emp

12. What is the difference between union and union all
UNION removes duplicate records (where all columns in the results are the same), UNION ALL does not.

There is a performance hit when using UNION vs UNION ALL, since the database server must do additional work to remove the duplicate rows, but usually you do not want the duplicates (especially when developing reports).

ORA-03113: & ORA-19809: & ORA-19804: &ORA-19815: WARNING: db_recovery_file_dest_size is 100.00% used,

It might be just because the lack of space in the recovery dest.

SQL> startup
ORACLE instance started.

Total System Global Area  778387456 bytes
Fixed Size                  1374808 bytes
Variable Size             385877416 bytes
Database Buffers          385875968 bytes
Redo Buffers                5259264 bytes
Database mounted.
ORA-03113: end-of-file on communication channel
Process ID: 4152
Session ID: 5 Serial number: 3

Check the alert log for further investination.
==============================================
contents from alert log
=======================
ORA-19815: WARNING: db_recovery_file_dest_size of 4039114752 bytes is 100.00% used, and has 0 remaining bytes available.
Errors in file c:\app\rpilla\diag\rdbms\mntest1\mntest1\trace\mntest1_arc2_4956.trc:
ORA-19809: limit exceeded for recovery files
ORA-19804: cannot reclaim 2866688 bytes disk space from 4039114752 limit

ORA-19815: WARNING: db_recovery_file_dest_size of 4039114752 bytes is 100.00% used, and has 0 remaining bytes available.
************************************************************************
You have following choices to free up space from recovery area:
1. Consider changing RMAN RETENTION POLICY. If you are using Data Guard,
   then consider changing RMAN ARCHIVELOG DELETION POLICY.
2. Back up files to tertiary device such as tape using RMAN
   BACKUP RECOVERY AREA command.
3. Add disk space and increase db_recovery_file_dest_size parameter to
   reflect the new space.
4. Delete unnecessary files using RMAN DELETE command. If an operating
   system command was used to delete files, then use RMAN CROSSCHECK and
   DELETE EXPIRED commands.
************************************************************************
I used the 4th suggestion by deleting archive log files from db_recovery_file_dest.

login

rman target /

list backup;
list copy;
delete archivelog all;


ORA-19815: WARNING: db_recovery_file_dest_size is 100.00% used,


Sat May 30 08:28:20 2015
ARC2 started with pid=22, OS id=38112
ARC1: Archival started
ARC2: Archival started
ARC1: Becoming the 'no FAL' ARCH
ARC1: Becoming the 'no SRL' ARCH
ARC2: Becoming the heartbeat ARCH
Sat May 30 08:28:20 2015
ARC3 started with pid=23, OS id=39704
Errors in file e:\app\murthy\diag\rdbms\orcl\orcl\trace\orcl_arc1_39816.trc:
ORA-19815: WARNING: db_recovery_file_dest_size of 4039114752 bytes is 100.00% used, and has 0 remaining bytes available.
Errors in file e:\app\murthy\diag\rdbms\orcl\orcl\trace\orcl_ora_38608.trc:
ORA-19815: WARNING: db_recovery_file_dest_size of 4039114752 bytes is 100.00% used, and has 0 remaining bytes available.
************************************************************************
You have following choices to free up space from recovery area:
1. Consider changing RMAN RETENTION POLICY. If you are using Data Guard,
   then consider changing RMAN ARCHIVELOG DELETION POLICY.
2. Back up files to tertiary device such as tape using RMAN
   BACKUP RECOVERY AREA command.
3. Add disk space and increase db_recovery_file_dest_size parameter to
   reflect the new space.
4. Delete unnecessary files using RMAN DELETE command. If an operating
   system command was used to delete files, then use RMAN CROSSCHECK and
   DELETE EXPIRED commands.
************************************************************************
Errors in file e:\app\murthy\diag\rdbms\orcl\orcl\trace\orcl_ora_38608.trc:
ORA-19809: limit exceeded for recovery files
ORA-19804: cannot reclaim 44892672 bytes disk space from 4039114752 limit
ARCH: Error 19809 Creating archive log file to 'E:\APP\MURTHY\FLASH_RECOVERY_AREA\ORCL\ARCHIVELOG\2015_05_30\O1_MF_1_98_%U_.ARC'
Errors in file e:\app\murthy\diag\rdbms\orcl\orcl\trace\orcl_ora_38608.trc:
ORA-16038: log 2 sequence# 98 cannot be archived
ORA-19809: limit exceeded for recovery files
ORA-00312: online log 2 thread 1: 'E:\APP\MURTHY\ORADATA\ORCL\REDO02.LOG'
USER (ospid: 38608): terminating the instance due to error 16038
************************************************************************
You have following choices to free up space from recovery area:
1. Consider changing RMAN RETENTION POLICY. If you are using Data Guard,
   then consider changing RMAN ARCHIVELOG DELETION POLICY.
2. Back up files to tertiary device such as tape using RMAN
   BACKUP RECOVERY AREA command.
3. Add disk space and increase db_recovery_file_dest_size parameter to
   reflect the new space.
4. Delete unnecessary files using RMAN DELETE command. If an operating
   system command was used to delete files, then use RMAN CROSSCHECK and
   DELETE EXPIRED commands.
************************************************************************
Instance terminated by USER, pid = 38608

To check the free space :

select name,
floor(space_limit/1024/1024) "Size_MB",
ceil(space_used/1024/1024) "Used_MB"
from v$recovery_file_dest
order by name;
/
  Solution : 

  open CMD>

1. RMAN
2. connect /
3. crosscheck archivelog all;
4. delete archivelog all completed before 'sysdate -7';
5. Prompt for Yes or No
6. Y and enter
7. exit

C:\Users\jnmurthy>rman target /

Recovery Manager: Release 11.2.0.1.0 - Production on Sat May 30 08:44:13 2015

Copyright (c) 1982, 2009, Oracle and/or its affiliates.  All rights reserved.

connected to target database: ORCL (DBID=1381995653)

RMAN> show all;

using target database control file instead of recovery catalog
RMAN configuration parameters for database with db_unique_name ORCL are:
CONFIGURE RETENTION POLICY TO REDUNDANCY 1; # default
CONFIGURE BACKUP OPTIMIZATION OFF; # default
CONFIGURE DEFAULT DEVICE TYPE TO DISK; # default
CONFIGURE CONTROLFILE AUTOBACKUP OFF; # default
CONFIGURE CONTROLFILE AUTOBACKUP FORMAT FOR DEVICE TYPE DISK TO '%F'; # default
CONFIGURE DEVICE TYPE DISK PARALLELISM 1 BACKUP TYPE TO BACKUPSET; # default
CONFIGURE DATAFILE BACKUP COPIES FOR DEVICE TYPE DISK TO 1; # default
CONFIGURE ARCHIVELOG BACKUP COPIES FOR DEVICE TYPE DISK TO 1; # default
CONFIGURE MAXSETSIZE TO UNLIMITED; # default
CONFIGURE ENCRYPTION FOR DATABASE OFF; # default
CONFIGURE ENCRYPTION ALGORITHM 'AES128'; # default
CONFIGURE COMPRESSION ALGORITHM 'BASIC' AS OF RELEASE 'DEFAULT' OPTIMIZE FOR LOAD TRUE ; # default
CONFIGURE ARCHIVELOG DELETION POLICY TO NONE; # default
CONFIGURE SNAPSHOT CONTROLFILE NAME TO 'E:\APP\MURTHY\PRODUCT\11.2.0\DBHOME_1\DATABASE\SNCFORCL.ORA'; # default


before deleted the file location and size
SYS@orcl:SQL>show parameter recovery_file_dest;

NAME                                 TYPE        VALUE
------------------------------------ ----------- ------------------------------
db_recovery_file_dest                string      E:\app\Murthy\flash_recovery_area
db_recovery_file_dest_size           big integer 30M


Above 3rd and 4th command check for the archieve log file and delete the old archieve log file which is older than the week from current date.
So Now we have free space in "flash_recovery_area" .
 After deleted the backup-ed archive files:

SYS@orcl:SQL>show parameter recovery_file_dest;

NAME                                 TYPE        VALUE
------------------------------------ ----------- ------------------------------
db_recovery_file_dest                string      E:\app\Murthy\flash_recovery_area
db_recovery_file_dest_size           big integer 300M
After successfully deleted will get the space and then try to startup the db.

SYS@orcl:SQL>startup
ORACLE instance started.

Total System Global Area 1071333376 bytes
Fixed Size                  1375792 bytes
Variable Size             713032144 bytes
Database Buffers          352321536 bytes
Redo Buffers                4603904 bytes
Database mounted.
Database opened.

more commands :

SQL> show parameter alert
NAME                                 TYPE        VALUE
------------------------------------ ----------- ------------------------------
log_checkpoints_to_alert             boolean     FALSE

SQL> show parameter BACKGROUND_DUMP_DEST
NAME                                 TYPE        VALUE
------------------------------------ ----------- ------------------------------
background_dump_dest                 string      e:\app\****\diag\rdbms\za1\za1\trace

SQL> show parameter db_recovery_file_dest_size
NAME                                 TYPE        VALUE
------------------------------------ ----------- ------------------------------
db_recovery_file_dest_size           big integer 3852M

Tuesday, June 9, 2015

Block Change Tracking file

Block Change Tracking (file)

RMAN's change tracking feature for incremental backups improves incremental backup performance by recording changed blocks in each datafile in a change tracking file. If change tracking is enabled, RMAN uses the change tracking file to identify changed blocks for incremental backup, thus avoiding the need to scan every block in the datafile.


Change tracking is disabled by default, because it introduces some minimal performance overhead on database during normal operations. However, the benefits of avoiding full datafile scans during backup are considerable, especially if only a small percentage of data blocks are changed between backups. If backup strategy involves incremental backups, then we should enable change tracking.

One change tracking file is created for the whole database. By default, the change tracking file is created as an Oracle managed file in DB_CREATE_FILE_DEST. We can also specify the name of the block change tracking file, placing it in any desired location.

Using change tracking in no way changes the commands used to perform incremental backups, and the change tracking files themselves generally require little maintenance after initial configuration.

From Oracle 10g, the background process Block Change Tracking Writer (CTWR) will do the job of writing modified block details to block change tracking file.

In a Real Applications Clusters (RAC) environment, the change tracking file must be located on shared storage accessible from all nodes in the cluster.

Oracle saves enough change-tracking information to enable incremental backups to be taken using any of the 8 most recent incremental backups as its parent.

Although RMAN does not support backup and recovery of the change-tracking file itself, if the whole database or a subset needs to be restored and recovered, then recovery has no user-visible effect on change tracking. After the restore and recovery, the change tracking file is cleared, and starts recording block changes again. The next incremental backup after any recovery is able to use change-tracking data.

After enabling change tracking, the first level 0 incremental backup still has to scan the entire datafile, as the change tracking file does not yet reflect the status of the blocks. Subsequent incremental backup that use this level 0 as parent will take advantage of the change tracking file.

Checking Whether Change Tracking is enabled
From SQL*Plus, we can query V$BLOCK_CHANGE_TRACKING to determine whether change tracking is enabled or not. 

SQL> select status from V$BLOCK_CHANGE_TRACKING;
        ENABLED   => block change tracking is enabled.
        DISABLED  => block change tracking is disabled.

Query V$BLOCK_CHANGE_TRACKING to display the filename.
SQL> select filename from V$BLOCK_CHANGE_TRACKING;
 
Enabling and Disabling Change Tracking
We can enable or disable change tracking when the database is either open or mounted. To alter the change tracking setting, we must use SQL*Plus to connect to the target database with administrator privileges.

To store the change tracking file in the database area, set DB_CREATE_FILE_DEST in the target database. Then issue the following SQL statement to enable change tracking:
SQL> ALTER DATABASE ENABLE BLOCK CHANGE TRACKING;  

We can also create the change tracking file in a desired location, using the following SQL statement:
SQL> ALTER DATABASE ENABLE BLOCK CHANGE TRACKING USING FILE '/u01/rman/rman_change_track.f';

The REUSE option tells Oracle to overwrite any existing file with the specified name.
SQL> ALTER DATABASE ENABLE BLOCK CHANGE TRACKING USING FILE '/u01/rman/rman_change_track.f' REUSE;

To disable change tracking, use this SQL statement:
SQL> ALTER DATABASE DISABLE BLOCK CHANGE TRACKING;  

If the change tracking file was stored in the database area, then it will be deleted when we disable change tracking.

Moving the Change Tracking File
If you need to move the change tracking file, the ALTER DATABASE RENAME FILE command updates the control file to refer to the new location.

1.
If necessary, determine the current name of the change tracking file:

SQL> SELECT filename FROM V$BLOCK_CHANGE_TRACKING;
        /u01/rman/rman_change_track.f

2.
Shutdown the database.

SQL> SHUTDOWN IMMEDIATE

3.
Using host operating system commands, move the change tracking file to its new location.

$ mv /u01/rman/rman_change_track.f /u01/rman_new/rman_change_track.f

4. Mount the database and move the change tracking file to a location that has more space. For example:
SQL> ALTER DATABASE RENAME FILE '/u01/rman/rman_change_track.f' TO '/u01/rman_new/rman_change_track.f';

5.
Open the database.

SQL> ALTER DATABASE OPEN;


SQL> SELECT filename FROM V$BLOCK_CHANGE_TRACKING;
        /u01/rman_new/rman_change_track.f

If you cannot shutdown the database, then you must disable change tracking and re-enable it, at the new location:
SQL> ALTER DATABASE DISABLE BLOCK CHANGE TRACKING;
SQL> ALTER DATABASE ENABLE BLOCK CHANGE TRACKING USING FILE '/u01/rman_new/rman_change_track.f';

If you choose this method, you will lose the contents of the change tracking file. Until the next time you complete a level 0 incremental backup, RMAN will have to scan the entire file.

Estimating Size of the Change Tracking File on Disk
The size of the change tracking file is proportional to the size of the database and the number of enabled threads of redo. The size is not related to the frequency of updates to the database.

Typically, the space required for block change tracking is approximately 1/30,000 the size of the data blocks to be tracked. The following two factors that may cause the file to be larger than this estimate suggests:
  • To avoid overhead of allocating space as database grows, the change tracking file size starts at 10MB, and new space is allocated in 10MB increments. Thus, for any database up to approximately 300GB the file size is no smaller than 10MB, for up to approximately 600GB the file size is no smaller than 20MB, and so on.
  • For each datafile, a minimum of 320K of space is allocated in the change tracking file, regardless of the size of the file. Thus, if you have a large number of relatively small datafiles, the change tracking file is larger than for databases with a smaller number of larger datafiles containing the same data.
SELECT FILE#, INCREMENTAL_LEVEL, COMPLETION_TIME, BLOCKS, DATAFILE_BLOCKS FROM V$BACKUP_DATAFILE WHERE INCREMENTAL_LEVEL > 0 AND BLOCKS / DATAFILE_BLOCKS > .5 ORDER BY COMPLETION_TIME;